Friday, August 23, 2013

Now For Something Different

My Sister-in-Law is getting married in just a few short weeks :)
Unfortunately she is a reluctant bride
Now don't get me wrong she is happy to be married, it's just the whole wedding thing that doesn't look good to her. Even tougher for her is the fact that she is the only daughter in her family. That of course means my Mother-in-Law only gets to do this once so she is going the whole hog lol.
I managed to avoid most of the clashes :)
but I did offer to help with the bridal shower

I got to do the gift bags


The wedding has a snow theme
They are getting married on the slopes :)
For the shower they picked white and blue
White for the Snow
and
Blue for the Sky


This is what I put in each bag


Some lollies, a Raffaello (snow ball lol) and some sour hearts


Our blushing bride to be wanted no silly games but her mother felt we needed something to pass the time, the solution quiet independent games with a lovely scented pen.


For a wedding in the snow you will need a scarf :)


To finish it off a miniature snow globe - a cute keepsake


All fits beautifully in these white paper bags with blue and white flowers and ribbons


Lastly a surprise
A garter - but what it's for is a secret shhh

I had a lot of fun making these, I learnt heaps of new skills and used up lots of creativity, now I just have to hope everyone else loves it too :)

Stephanie xoxo

Monday, August 19, 2013

A pep talk and a peplum

Yes I know its been a long, long time coming but finally here is my review of the

by


I love this pattern!!!!!!
These two little darlings are quite slim 
and this pattern made it very easy to adjust for that perfect fit.


 In fact Miss J is only a size 2 in width but a 7 in length


And Miss O is a 8 in length but a 5 in width


The only difficulty I had with the pattern was attaching the collar, it was always too big and the tutorial did say that might be the case and just to adjust it when attaching which I did, but with that in mind I would say this is a pattern for an 
intermediate sewer (or adventurous beginner).

Would I make more of them?
You bet! (I already have)

Don't forget to get a copy for yourself :)

by

Stephanie xoxo

Monday, June 10, 2013

Pinafore Review

Today's pattern review is 
by

Why this pattern?
I wanted to make a pinafore to go with my ruffle bottoms. I had mad quite a few reversible pinafores from "Smashed Peas and Carrots" FREE pinafore pattern but I wanted to be able to make lots of different sizes (that one is 6 months only) and I wanted to add lace/ruffles on the bottom part only without it looking weird. The sizing options for this pattern are 3m-3T with bonus 18"doll.
 Here is a size 3-6 months on Baby T. 
The pattern itself only requires 3 pages of printing! 
The instructions made the tie placement easy :) 
This pattern does not state that it is reversible, but mine is.

With mine I used lace for the tie and I skipped adding the ruffles and added lace after everything else was finished.
It was important to me that the arm holes weren't too big and that it wasn't too long at the front.
I think this pattern is perfect for showing off cute little ruffle bottoms!

Want your own copy check it out here
Ellen's Ruffled Pinafore
by
Little Lizard King

Stephanie xoxo

Wednesday, June 5, 2013

Sweet Cheeks

A Review
as promised :)
by
 I think there is nothing cuter than ruffle bottoms on a baby girl, so lets put them on one :)
Introducing Baby T <3
When I decided to make some of these ruffle bottoms I looked at masses of patterns. I wanted to make sure I got one that didn't have that saggy butt look, I was also worried about ruffle placement, not too long  that it looks like half a skirt and not too short that it doesn't cover the bottom of the pant. This pattern was perfect!!!!
No saggy butt for Baby T
The pattern itself was easy to follow, nothing terribly tricky. 
The step by step tutorial was very clear.
I really like that each size had its own pattern, that way you can print off just what you need and not worry if you are cutting along the right line (I've made some mistakes with that before)
The only thing I did different from the pattern was the hems on the ruffles. I have a fabulous rolled hem foot on my Janome. I love it, it small, neat and requires very little fabric! I also added the lace to each ruffle.
Of course we can't have Baby T getting around in just her ruffle bottoms, so I embellished this singlet with a scrap fabric button flower and made her this cute lace flower headband.

Want to make some of your own ruffle bottoms?
I would definitely get this pattern

by

Stephanie xoxo

Tuesday, June 4, 2013

Delayed

Diaper cover pattern


I know I was supposed to post a review yesterday but with bad weather and a case of Tonsillitis I haven't got photos :( I am now feeling much better the sun is out and I will attempt to get photos today and have the review up by the end of the week.
Stephanie xoxo

Thursday, May 30, 2013

"Pussy Cat, Pussy Cat

Where have you been?
I've been to London to visit the Queen"

I wish lol


So what have I been up to this last month?
I have been sewing a bit, trying some new patterns.
I thought I might do some reviews just for fun 
(no designer asked me and I paid for all the patterns)
Over the next little while I will do some show and tell on these patterns


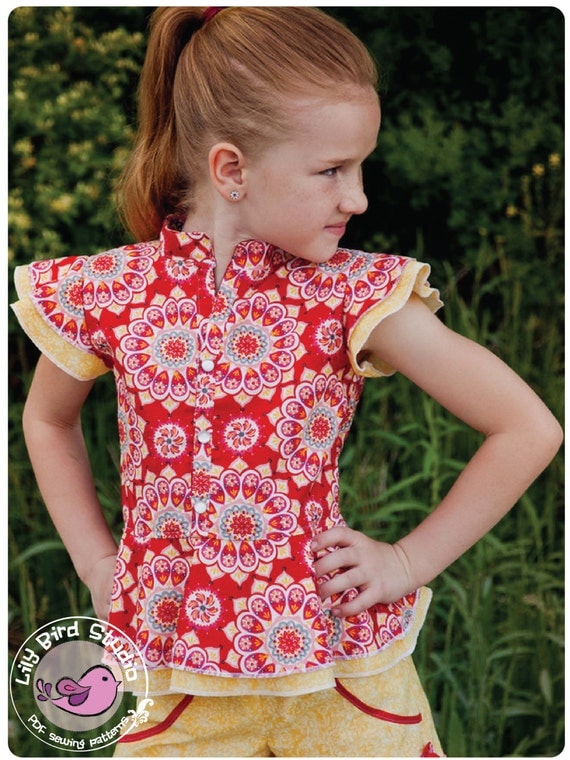
Lily Bird Studio PDF sewing pattern Amy's peplum top / blouse -  12 mths to 10 yrs - overskirt, mandarin style collar, ruffle sleeves

(I know I have talked about this one before but I'm doing something a little different with it)

I have linked these all back to the designers own page but I buy all my patterns through
I love that you can compare different patterns for the same kind of item and pick the one that best suits you. I also love that they are all pdf so I can get started right away :)

I will start with the Ruffle Bottoms from "Mama Can Do It" on Monday.
See you then

Stephanie xoxo

Monday, May 13, 2013

And the winner is......

Comment 311
Melissa Corry
who said
"I am following :)"
I guess it pays to be a follower lol
I did check out her other comment which said her favourite blog was "Cluck, Cluck, Sew"
I like that one as well :)
I also want to tell you the 2 patterns Melissa picked as they are gorgeous
From "Kate Conklin Designs" we have

and from "Chasing Cottons" we have
Great picks :)

I have to tell you I was amazed at how many entries my little giveaway got and very excited to see some new followers.
I have decided that I will put together a list of all the blogs that got a mention, but you will have to be patient as I will have to go through 694 comments!!!!!!

Stephanie xoxo

Tuesday, May 7, 2013

Bow Ties are Cool

Dr Who is of course the ultimate source for all things stylish in men's fashion right now
so


today I'm going to show you how I drafted my bow tie for LKJ.


Lets start by gathering our supplies
you will need
4 pieces of paper (or 2 really long pieces)
sticky tape
measuring tape
ruler
pencil
scissors for cutting paper

Step 1
You need to decide what size bow you would like. LKJ's is a fairly standard size bow.
2 3/4" high
so mark this measurement along the short edge of 1 piece of paper


Step 2.
Now decide how wide you want the bow. LJK's is
2 1/4"
So rule a line half way between your first measurent out 2 1/4"


Step3.
Fold your paper along that last line


Step4.
measure down 1" and mark
Join the 2 marks


To give it a softer feel you can make this line curvy like I did with LKJ's


Step 6.
cut along the line


Step 7.
This is where I felt I really got clever lol
Unfold your paper then fold the first part up and trace it
(sounds weird here is a picture)


Step 8.
Fold it in half again and cut along that line
now it looks like this


Step 9.
Repeat step 7


Step 10.
Now lay it flat and fold it in half again
we are now going to make the bit that goes around the neck.
I made my neck piece 1" wide so its easy to tie and sits under the collar nicely.
From the fold measure down 1/2"


Step 11.
Make the 2 end point meet up
as in picture bellow


Step 12
Measure out knot allowance 2 1/2"


Step 13
Measure out 1/2 your neck measurement
(You will now need to stick a second piece of paper to the first for length)
LKJ's measurement was 9 1/2"
so we measure out 4 3/4"


Step 14 
cut it out, open it up and 
tada
1 bow-tie pattern


At this point it doesn't have seam allowances so add those however works for you
here is how I did it


Now don't add seam allowances to the end as this is where you fold your material


Ok that's it, You're done!


Couldn't have put it better myself

Stephanie xoxo


Linked up here :)